Writing an Express App
We've made a couple of dynamic, database driven web applications.
How did they work? What made the request? How was the response generated? What did the response consist of? →
- the browser would make some request based on url entered, a clicked link or a submitted form
- our Express application would respond to that request by:
- getting or writing data to the database
- using resulting data to fill out a template
- sending back html in the response body
- the browser would render the resulting html page
A High Level View
Let's make a quick diagram of how that all worked. A run-of-the-mill database driven web application. →
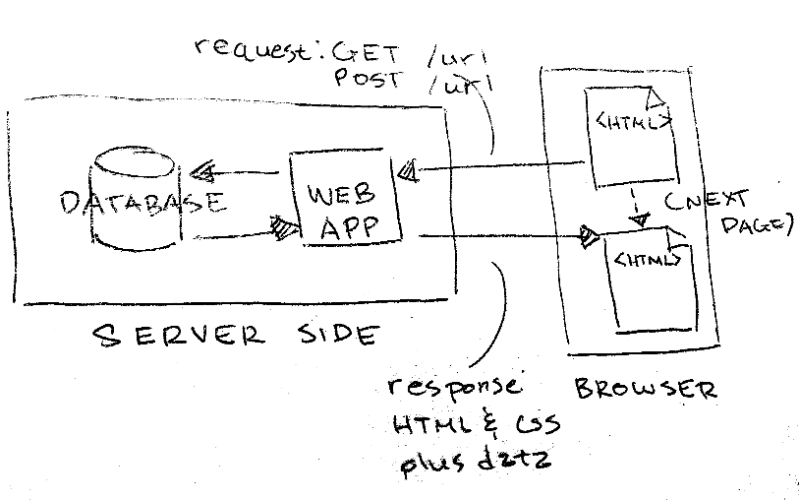
Traditional Web Applications
We've made traditional web applications.
- the application itself is mostly server-side; the client side is usually just presentation
- it's typical for most interactions to result in another page being loaded entirely (or in the same page being refreshed).
- sometimes, you have to wait a little bit for the next page (bummer)
- this is kind of expected behavior, though. After all, the web is just a bunch of interconnected documents, right?
How does this user experience differ from native desktop and mobile apps? →
- generally speaking, desktop and mobile apps seem more real time
- there's no waiting for a page to load; it just happens
Single Page / Hybrid Web Applications
Another way to deliver a web application is as a single page:
- in this type of application, a single page is loaded
- appropriate data and resources are added to the page as necessary (usually in response to user interactions)
- without the page reloading
- without transferring control to another page
- the majority of the application itself is on the client side, and the server acts as a simple data store
- which results in a faster and more responsive user experiences (again, similar to a desktop or mobile application)
Single Page / Hybrid Web Applications Continued
How do you think this is achieved? What processes would need to take place? →
- while on a page, the user can trigger background requests to the server through certain interactions
- the server sends back data rather than an html document…
- when these requests return they augment or modify the page that the user is on
- consequently, the page does not reload, but ui elements change based on the interaction
This is possible using combination of client side technologies, commonly called AJAX… →
AJAX
AJAX is short for asynchronous JavaScript and XML. It's basically a bunch of interrelated technologies and techniques used to create asynchronous web applications:
- HTML and CSS for presentation
- JS and access to the DOM to create dynamic user interfaces
- JS and XMLHttpRequest (or the new fetch api) to allow asynchronous data exchange between browser and server
- Server side applications to allow reading and writing of data
- JSON as a convenient and flexible data format
- the XML part of the name is a misnomer, as the data format can be anything else, such as JSON or even HTML fragments!
- sometimes you may run into other funny acronyms to accommodate this (AJAJ comes to mind)
AJAX - a High Level View
Let's draw out how all of these technologies may come together as a single page web app… →
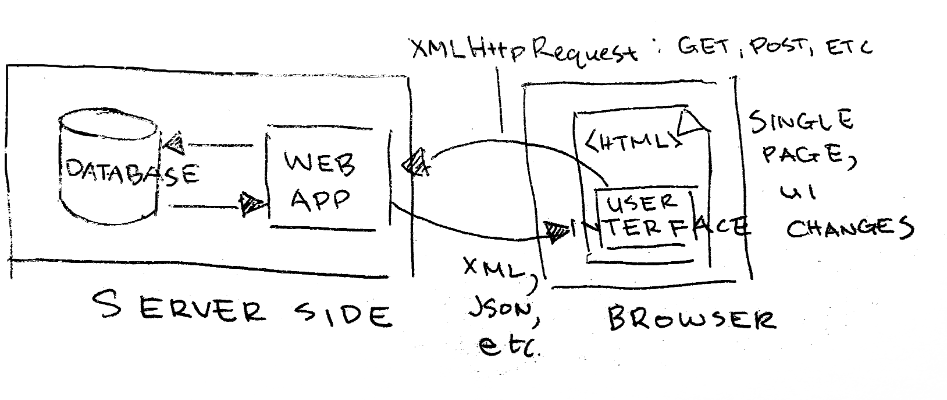
Putting Everything Together / The Missing Ingredient
When these technologies are combined, our client side web applications can make incremental updates to the user interface without reloading the entire page. Great!
We know most of these technologies. What's missing? →
-
HTML and CSS(most of you already knew this coming into class, and we did a quick review)
-
JavaScript and access to the DOM(we went over this a lot)
-
Server side applications(Express)
-
JSON - however, we have yet to look at XMLHttpRequest
HTTP Requests
Hey. So. Remember that time when we actually used some Server Side Javascript to make HTTP Requests? →
- we used the request module to issue asynchronous http requests from Node
- (specifically, we saw it in the basketball homework assignment)
- note that it's a server side module
XMLHttpRequest
In client-side JavaScript, there's a feature analogous to the request module.
XMLHttpRequest is JavaScript object that allows browser based JavaScript to make http requests!
- it provides an interface for retrieving data from a URL
- (without having to reload a page or load another page)
- a page can update just a part of the itself rather than reloading itself entirely
THIS IS AMAZING! (though the api is kind of terrible)
(Again, you can check out the fetch api, for a newer, but less supported way of making background http requests)
XMLHttpRequest History
We need a campfire. We don't have one. But here it goes: →
- XMLHttpRequest was originally designed by Microsoft for Internet Explorer in the 1990's (crazy times, eh?)
- XML (a robust, but fairly heavy markup-language / data exchange format) was en vogue at the time (anyone familiar with it?)
- so rather than just calling the object HttpRequest (which would have been totally accurate)
- XML was tacked on to the beginning of the name
- though… XML was a valid response format
- (as was JSON, HTML, etc.)
- it became so popular (because it allowed features such as type-ahead autocomplete) that it was adopted by Mozilla
- it's currently being standardized by the w3c
- (also, what's going on with the inconsistent casing)? XMLHttpRequest?
Great… XMLHttpRequest
How does it work? →
- create an XMLHttpRequest object
- configure it with the appropriate request method and url
- specify what it should do:
- on error
- when the content loads
- send the request
XMLHttpRequest, Creation and Open
Create an XMLHttpRequest object using the constructor:
const req = new XMLHttpRequest();
Use the open method to configure the object. It takes 3 arguments:
- request method (string)
- url (string)
- asynchronous (boolean)
req.open('GET', url, true);
XMLHttpRequest, Load and Error
Specify what it should do on error vs onload.
You can also use the addEventListener interface that we just learned:
req.addEventListener('load') { ... };
req.addEventListener('error') { ... };
There's also the older style onerror and onload properties on the XMLHttpRequest object:
req.onload = function() { ... };
req.onerror = function() { ... };
XMLHttpRequest responseText and status
Your XMLHttpRequest object has a couple of useful properties:
status- the response status code (for example, 200)responseText- the actual body of the response
Typically, you would use the status to determine if the request were successful:
if (req.status >= 200 && req.status < 400) {
	// do some cool stuff
}
XMLHttpRequest, send()
Use send() to actually send your request.
- send has an optional argument – the data that you want send as your request body
- you'll usually leave out this argument
- unless you're posting data (in which case the POST data is sent along as the arugument)
- any event listeners you wish to set must be set before calling send()
req.send();
A Quick Example
Using this json file:
- request the file from a blank page
- parse the JSON… and insert each object's message into document.body as a div
Some setup to serve this exercise, as well as a few others: →
- setup a barebones express app
- create the json file above in your public folder
- create an html file called
hello.htmlin your public folder- set up some boilerplate html
- just add script tags to include the following
- create a JavaScript file called
hello.jsin your public/javascripts folder
Setting Up a Request
In your JavaScript file, hello.js:
- write code to setup a request to the following url:
'http://localhost:3000/hello.json'
- the request should be GET, and asynchronous should be true
const url = 'http://localhost:3000/hello.json';
const req = new XMLHttpRequest();
req.open('GET', url, true);
On Load Event Handler
Once we've successfully received data, add each object's message as a div to the body of the blank document. →
req.addEventListener('load', function() {
	if (req.status >= 200 && req.status < 400) {
		const messages = JSON.parse(req.responseText);
		messages.forEach(function(obj) {
			document.body.appendChild(
				document.createElement('div')).
				textContent = obj.message;
		});
	}
});
On Error Event Handler… and Sending
If there's an error… just create a text node for now: →
req.addEventListener('error', function(e) {
	document.body.appendChild(document.createTextNode('uh-oh, something went wrong ' + e));
});
Lastly… send the request. →
req.send();
What Happened?
Hey - we started out with a completely blank html page, but it has some text in it!?
Let's check out the network tab and refresh the page. →
- we made a request to
hello.html - which in turn requested
hello.js - which in turn used XMLHttpRequest to request
hello.json
hello!
Let's Cause an Error!
How do you think we can get an error to show up? →
- change the domain to something that doesn't exist
- change the page we're accessing so that we get a 404
- um… wait, do we handle a 404?
- we can! let's try it… →
else {
	document.body.appendChild(
		document.createTextNode(
		'request received a ' + req.status));
}
Triggering From a Click
We could also modify the code so that the request is only made when a user clicks a button. Let's start off by adding this markup. →
<h1>Messages</h1>
<input type="button" id="get-messages-button" value="GET MAH MSGS">
How would we change our JavaScript so that whenever you click the button above, it requests the messages in the json file and inserts them into the DOM? →
Integrating a Click Event
Just get the button and add a "click" event listener.
const button = document.getElementById('get-messages-button');
button.addEventListener('click', function() {
.
.
.
});
You can drop in all of you request code in the callback above.
- notice each time you press a button, a new request comes up in the network tab.
Will This Work With Any URL?
Let's try a little experiment:
- instead of requesting hello.json
- what if we tried requesting a page from cs.nyu.edu?
What do you think will happen? (Ignore the fact that the documents don't match at all, and we're not getting back json; there's something else off) →
- totally not allowed!
- the request will fail
- let's see. →
What? Access-Control-Allow-Origin. Huh? What?
Here's the error that we get:
XMLHttpRequest cannot load ...

'No Access-Control-Allow-Origin' header is present on
the requested resource. Origin 'http://localhost:3000'
is therefore not allowed access.
What do you think it means? →
- there's some header that's not present in the response
- so we can't have access to the content / resource
- (uh, maybe that wasn't much help)
CORS and SOP
No, really, what does it mean? →
We were not given access to the content, because we're not allowed to make cross domain requests to that server.
The two ideas that govern this are:
- Same Origin Policy (SOP)
- Cross Origin Resource Sharing (CORS)
Same Origin Policy
The same origin policy is a policy implemented by browsers that restricts how a document, script or data from one origin can interact with a document, script or data from another origin.
- it permits scripts running on pages originating from the same site to access documents, scripts or data from each other
- but prevents scripting access to these resources if they are on different sites
- note that access depends on the kind of request being made
- (for regular GET requests, this usually means that the request can be made, but the response is not allowed to be read by the script)
- (for other requests, the request may be outright denied!)
- of course, because this is specification includes scripting access, it applies to XMLHttpRequests (we'll see an exception shortly)
Same Site?
What does same site or same origin mean exactly? →
From MDN…
- two pages have the same origin if the protocol, port (if one is specified), and host are the same for both pages
- determine if the following pages would have the same origin as: →
http://store.company.com/dir/page.htmlhttp://store.company.com/dir2/other.htmlYeshttp://store.company.com/dir/inner/another.htmlYeshttps://store.company.com/secure.htmlNo - different protocolhttp://store.company.com:81/dir/etc.htmlNo - different porthttp://news.company.com/dir/other.htmlNo- different host
Why Same Origin Policy?
That seems weirdly restrictive, right? Why do you think same origin policy exists? What is it trying to prevent? →
A hint from wikipedia: "This mechanism bears a particular significance for modern web applications that extensively depend on HTTP cookies to maintain authenticated user sessions"
- if a user is logged in to another site
- and a script from a different origin is allowed to make requests
- it could make requests to and from the site that the user is logged into!
- Cross Site Request Forgery! (CSRF)
An Example of CSRF
Imagine that you're logged into your bank account: →
- same origin policy is not implemented in your browser, and your bank has no additional csrf protection (bad news)
- I send you a link to my page of animated gifs of dancing pizza
- no one can resist animated gifs and pizza, so you click on the link
- once on my page, behind the scenes, I can use
XMLHttpRequestto… - get a page that's behind your bank's login (something like mybank/account) because you're already logged in
- from there I can:
- steal data - read information that I should not be allowed to read
- possibly take actions by issuing POST requests
- (^^^ slightly more complicated than this, but… you get the idea)
- YIKES!
Convinced?
I think we can agree that Same Origin Policy is kind of… um important.
But… how do we share data across sites? How do APIs work? →
Let's try a quick experiment with githubs public API. →
GitHub API
You can actually get info from a GitHub user through GitHub's api by using the following URL:
https://api.github.com/users/[a username]/repos
Let's try checking out what it says about one of my GitHub accounts by hitting the actual api url: https://api.github.com/users/foureyes/repos
[{
"id": 26084780,
"name": "bjorklund",
"full_name": "foureyes/bjorklund",
"owner": {
	"login": "foureyes",
	"avatar_url": "https://avatars.githubusercontent.com/u/356512?v=3",
	"url": "https://api.github.com/users/foureyes",
	.
	.
},
"private": false,
.
.
}]
Let's Build a Repository Browser
We could probably build a quick form that takes in a username →
- …and lists off all of the repositories that the user has
- let's give it a try. →
- how about a wireframe?
- a use case?
- maybe some markup first (what form elements would we need? should we have some styles… sure!)
- then some JavaScript
Some more docs regarding the GitHub API: →
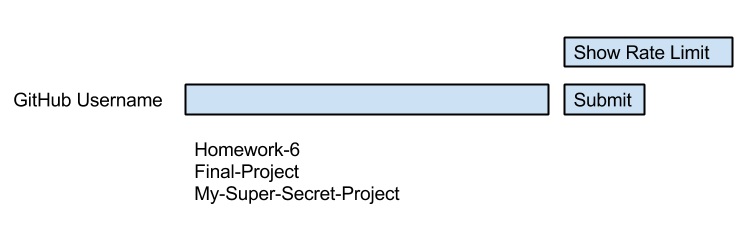
Repository Viewer Wireframe
Our repository viewer will have: →
- one text field where you can input a github username
- a list all of that person's pubic repositories when you click on submit
- (optionally) a button to check for rate limit (of course!)
It might look like this:
Reading API Documentation
Typically, API documentation will specify:
- http request method to use
- the path to the resource
- the response format and status code
- the actual data contained within the response
Let's take a look at the two end points we'll be using. →
Show Rate Limit Status
The endpoint / URL for retrieving info about the rate limit is:
GET /rate_limit
Using this URL with my account: https://api.github.com/rate_limit
We're interested in resources.core.limit… this is what we get back:
{
  "resources": {
    "core": {
      "limit": 60,
      "remaining": 58,
      "reset": 1447761547
    },
    "search": {
      "limit": 10,
      "remaining": 10,
      "reset": 1447759711
    }
  },
  "rate": {
    "limit": 60,
    "remaining": 58,
    "reset": 1447761547
  }
}
List User Repos
The endpoint / URL for retrieving repository info from GitHub is:
GET /:username/repos
Using this URL with my account: https://api.github.com/users/foureyes/repos
We get back…
[{
"id": 26084780,
"name": "bjorklund",
"full_name": "foureyes/bjorklund",
"owner": {
	"login": "foureyes",
	"avatar_url": "https://avatars.githubusercontent.com/u/356512?v=3",
	"url": "https://api.github.com/users/foureyes",
	.
	.
},
"private": false,
.
.
}]
Let's Start With Some Markup
We'll need:
- a text input for the username
- a button to submit
- a button to ask for the rate limit
- a place to insert the repository names as a list
- a place to insert the rate limit info
Maybe Some Markup Like This?
Here's our HTML:
<h2>Repository Viewer</h2>
<input type="button" id="get-rate-limit" name="get-rate-limit" value="Get Rate Limit">
<pre id="rate-limit">
</pre>
<label for="username">GitHub Username</label>
<input type="text" id="username" name="username">
<input type="button" id="get-repos" name="get-repos" value="Get Repositories">
<div id="container">
			<ul></ul>
</div>
Setting Up … Getting Required Elements
Let's gather the buttons and add event listeners to them. →
document.addEventListener('DOMContentLoaded', init);

function init() {
	console.log('init');
	var button = document.getElementById('get-repos'),
		rateLimitButton = document.getElementById('get-rate-limit');

	button.addEventListener('click', handleClick);
	rateLimitButton.addEventListener('click', handleRateLimitClick);
}
Handling a Click on the Rate Limit Button
To get the rate limit, we can use the following url http://api.github.com/rate_limit. Let's set up the request in our handleRateLimitClick function →
function handleRateLimitClick() {
	var req = new XMLHttpRequest(),
		url = 'http://api.github.com/rate_limit';

	req.open('GET', url, true);
	req.addEventListener('load', handleRateLimitResponse);
	req.send();
}
Dealing with the Response
Let's define a function that populates an element, the pre tag, with the data from the API Limit call. →
function handleRateLimitResponse() {
	var pre = document.getElementById('rate-limit'),
		response = JSON.parse(this.responseText);
	if (this.status >= 200 && this.status < 400) {
		pre.textContent = response.rate.limit + ' Limit, '
				+ response.rate.remaining + ' Remaining, '
				+ new Date(response.rate.reset * 1000);
	}
}
Now for the Actual Repo Browser…
When clicking view repositories, we should retrieve the repositories for the user in the text field. First, let's set up our click handler… and configure a request within it. →
function handleClick(evt) {
	var req = new XMLHttpRequest(),
		url = 'http://api.github.com/users/' +
			document.getElementById('username').value + '/repos';

	req.open('GET', url, true);
	req.addEventListener('load', handleResponse);
	req.send();
}
Lastly, Once we Have the Repository Data….
We can use the response from the API to drop in the repositories. Create a function that gets called when the data from the request has loaded. →
function handleResponse() {
	if (this.status >= 200 && this.status < 400) {
		var div = document.getElementById('container'),
			oldList = document.querySelector('#container ul'),
			ul = document.createElement('ul'),
			repos = JSON.parse(this.responseText);

		repos.forEach(function(obj) {
			ul.appendChild(document.createElement('li')).textContent = obj.name;
		});
		div.replaceChild(ul, oldList);
	}
}
Take a Quick Look at the Domains
See anything strange? →
Yeah… wait a second. Those are different domains? Aren't cross domain requests allowed? →
- Well. Yes…
- That is, unless the server your sending your request to sets some specific headers
- That's where CORS or Cross Origin Resource Sharing comes in
Cross Origin Resource Sharing
Cross Origin Resource Sharing (CORS) is a mechanism that allows resources, such as JSON, fonts, etc. to be requested from a domain from a different origin. From mdn:
- it works by adding HTTP headers that allow servers to describe the set of origins that are permitted to read that information using a web browser
- for example, Access-Control-Allow-Origin (a URL that specifies an allowed origin, or * for all), is header that the server will set in the response
- the browser will use that information to determine how to deal with cross domain requests
Hm. If That's The Case
How do you think we were able to contact GitHub's api? →
- it must have had some of those fancy CORS headers set
- Access-Control-Allow-Origin must be set to *
- how can we tell; how can we prove this? →
- let's check out the network tab on Chrome's developer tools →
It's Up to the Browser (and the Server)
So… how does this work behind the scenes. →
- for GETs and POSTs, the script can actually make a cross domain request and get a response back (wait, what?)
- but the browser, at the network level, prevents access to the response from the script
- for other HTTP request methods (and maybe more complicated GETs and POSTs), browsers will "preflight" the request by:
- soliciting supported methods from the server with an HTTP OPTIONS request method
- and then, upon "approval" from the server, sending the actual intended request with the appropriate HTTP request method
Back to CSRF
Going to our example of cross-site request forgery, issuing a background POST via scripting … to another domain seems like it'll work, because the request will actually go through!
Then… how is CSRF prevented, and how does SOP/CORS help in preventing CSRF
- one common method is to have token generated for each form that's a hidden input
- this token is checked when the form is submitted… but wait, this seems like we can circumvent it →
- the 1st background request can read the form's token! … but can it? →
- SOP prevents this from happening!
- some resources: CSRF prevention, SOP vs CSRF
Whoah Neat. Cross Domain Totally Works.
However, you may not always have access or contact with the server that's running the services. So, maybe they won't set the CORS headers for you. What are some other options around cross domain requests? →
- create a proxy that requests the resource for you (server side), but is on your domain
- request the data server side and cache the data; create a service that serves the cached data
- of course, these are all likely against terms of use
- (probably don't do this)
- also note that many apis have rate limits
- they also mostly require some sort of authentication
Hm. Does That Mean We Can Make Our Own APIs?
Yes. We can make our own APIs with Express.
The secret is:
res.json()
This returns a json response of the object that is passed in.
Let's try one where we read message objects out of MongoDB →
Here's a Schema
Just a run-of-the-mill message:
const Message = new mongoose.Schema({
	message: String,
	dateSent: Date
});
A Router That Exposes the API
Get all messages as JSON…
router.get('/api/messages', function(req, res) {
  Message.find({}, function(err, messages, count) {
    res.json(messages.map(function(ele) {
      return {
        'message': ele.message,
        'date': ele.dateSent
      };
    }));
  });
});