Anonymous Course Reviews (Sessions and Storing Data) - Thursday, March 22nd, by 11PM
Overview
Goals
This assignment will cover storing and retrieving data in a database and in an in-memory session store. You will:
- use the commandline mongodb client to create a database, collection and several documents
- use mongoose to read and write data to and from mongodb from an express application
- use pre-built session middleware to read and write data to and from an in-memory session store on a per session basis
Description
You'll be creating a site where users can anonymously post reviews for courses. By the end of this project… you should be familiar with:
- writing middleware
- some basic read and write operations with mongodb…
- integrating mongodb with an Express web application using Mongoose (See the example interaction at the end of this page).
You'll create a single express application with the following directory layout (when you're done with all of the directions, the folder hierarchy should match the look the same as the one listed below): 📁
/ (project root)
package.jsonnode_modules.gitignore.eslintrc.js/srcapp.jspublicimgcss- your css file
viewslayout.hbs- any other views
Your application will support the following routes:
GET /- show all course reviewsGET /reviews/add- show the add review formPOST /reviews/add- process a new reviewGET /reviews/mine- show the reviews added during the user's session
Finally, it should:
- be served on port 3000
- be run from the
/srcdirectory - use generated absolute paths where necessary (for example use
__dirname__andpublicwhen creating the public path for express static)
Submission Process
You will be given access to a private repository on GitHub.
- Push your changes to the homework repository on GitHub.
(4 points) Make at Least 4 Commits
- Commit multiple times throughout your development process.
- Make at least 4 separate commits - (for example, one option may be to make one commit per part in the homework).
Part 1 - Setup for Course Reviews App (Storing Data in a Database)
Installing MongoDB and Preparing Data
- to install MongoDB, use a package manager like apt on Linux or homebrew on MacOS (
brew install mongodb)… or follow the install instructions for your operating system on MongoDB's site - by default, MongoDB does not require a username/password to connect 😮
- if you'd like to add authentication you can follow this guide (optional, but recommended)
- if you add authentication, make sure to:
- (ideal) use environment variables /
process.envto set the username and password (but default to no credentials if environment variable(s) are not set) - (also ideal) read the username and password from a configuration file, but don't put the configration file under version control
- (not great, but easy) commit and push the version with no credentials, and keep the version with credentials locally … remembering to never commit and push that particular file
- (ideal) use environment variables /
- in order for you to connect to your database to work with data, your database server must be running
- for some installations, MongoDB will start when your computer starts
- for other installations, you'll have to start it manually
- you can test if your database is running by:
- attempting to connect to the test database ⚡
- in a terminal window, type in
mongo(in any directory) to start the commandline client - you should be given a message with the version number of the Mongo shell
- if it's not running, you have to start the database server manually:
- in a terminal window, type in
mongod; this starts the server - if it does not start because it's looking for a directory called
/data/db- this means that
mongodis looking for a place to store you data - this typically happens on OSX installations, sooo…
- check the docs… and then try:
- create the directory:
sudo mkdir -p /data/db - change the owner to your user (replace yourusername with your actual username for you system):
sudo chown -R yourusername:staff /data/
- this means that
- ensure that it is up and running by connecting to it using a commandline client… so in a different terminal tab/window, type in
mongo:
- in a terminal window, type in
- once you're connected with a commandline client (mongo), start inserting documents into a database called
hw05and a collection calledreviews:- reviews will have a course number, course name, semester (fall/spring/summer), year, professor's name, and a review field
- so to insert, just do this in the commandline client:
db.reviews.insert({ courseNumber: "CSCI-UA.0101", courseName: "Intro to CS", semester: "Fall", year: 2015, professor: "McTeacherson", review: "Now I can sort like pro!" }); - (inserting will automatically create the database and collection for you if they don't already exist)
- insert the following reviews:
CSCI-UA.0480, AIT, Spring, 2018, Versoza, The answer is always undefined
CSCI-UA.0002, Intro To Computer Programming, Fall, 2018, Foobarbaz, OMG you have to take this course
- use
db.reviews.find()to show all of the reviews that you've inserted- make sure there's something there…
- so that you know your web app actually has reviews to read!
- use
ctrl + dto exit the commandline client - (make sure you keep your database server running, though 🏃)
Directory Structure and Dependencies
Start your usual express app by:
- copying over an eslint configuration,
.eslintrc.json, from a previous assignment - creating a
package.jsonfile withnpm init - installing the appropriate modules and saving them to
package.jsonusing--save(this should have already been done from the previous parts) in the root directory of your project - additionally, installing mongoose:
npm install --save mongoose - creating a
srcdirectory… and within that directory- creating an
app.jsfile for your express app - activate express-static and create a
publicfolder (along with some folders for css, etc.) - configure hbs as the templating engine and create a
viewsfolder along withlayout.hbs - activate express.urlencoded (body parser) to parse http request bodies
- setting up and creating the appropriate folders for templating and serving static files
- creating an
- configure your server so that it uses port 3000
Connect to the Database
Create a file called db.js within src. db.js will contain:
- the code to connect to our database
- …and our Schema and model (which we'll use to access data in our database)
In db.js, add the require for the mongoose module:
const mongoose = require('mongoose') Leave a placeholder for your schema…
// my schema goes here!And, finally, add the code that connects to the database. We'll connect to the local instance of MongoDB, and we'll use a database called hw05 (this will be created for you once you start inserting documents… which you should have done already above!).
mongoose.connect('mongodb://localhost/hw05');
Or… with authentication
mongoose.connect('mongodb://username:password@localhost/hw05');
Schema
For larger projects, there is usually one file per schema, all located in a separate folder called models. For now, however, define the following Schema within db.js. Check out the slides on:
- the MongoDB Demo
- and/or the Mongoose API
- (or alternatively check out the docs!)
Since we're storing reviews, we'd like each document to have:
- a course number (a
String) - a course name (a
String) - the semester for the course (a
String) - a year (a
Number) - the professor's name (a
String) - the review to be posted (a
String)
Create a schema based on the above slides, and insert your code under your // my schema goes here! comment.
Then, use your schema to define your model… the model is used as a constructor to create new documents… or as an object with methods that allows the read or update of existing documents.
You can place the following code after your schema and before the connection (assuming that you're schema looks something like this) so that mongoose is aware that your model exists (it registers our model so that you can retrieve it later):
mongoose.model('Review', Review);
Part 2 - Displaying All Reviews, Adding Styles, and Adding Navigation
Overview
We'll be using mongoose to read in all of the reviews from the database. Then, we'll be able to display the reviews in a table.
Details
There's a bunch of setup that we need in order to integrate our databases access code with our express app:
- in
app.js, require thedb.jsfile that you created so that the code that you wrote for the Schema and for connecting to the databases is executed - at the top of
app.js, after you've created your application object:require('./db'); - after that, retrieve the model that you registered with mongoose:
const mongoose = require('mongoose');
const Review = mongoose.model('Review');
You can now use Review.find to retrieve all of the reviews in your database!
- create a route handler that accepts requests for
/ - in that route handler, the callback should use
Review.findto retrieve all reviews! findtakes a query object (just a regular object) that specifies the criteria for what we're searching for using name/value pairs… for example {year: 2016} would be all reviews for courses in 2016- if you leave the query object empty, it'll just give back all reviews
- the second argument for find is yet another callback… this time, it's the function that's executed when mongoose finishes finding stuff for you
- find works like this:
SomeModel.find({search: criteria}, function(err, varToStoreResult, count) { console.log(varToStoreResult); // <---- variable contains found documents! }); - so, once you've retrieved stuff from the database, you'll probably want to render your template… so in your callback, call
res.render, rendering whatever template you'd like to display your table - of course, you'll have to pass in your find results so that you can iterate over them in your template
- in your template, use standard
tablemarkup, with each row containing a review - try opening your page in your browser to show a table of all reviews:
http://localhost:3000 - finally, add styles to your page and add some simple navigation that will appear on this page as well as any other page that you create
- to add styles, place a css file in
public/css - use a
linktag inlayout.hbsto include it - style at your discretion (design will not be taken into account for grading, only the technical aspect of including a stylesheet will be graded)
- additionally, add the following navigation links (these should appear on every page):
- all reviews (
/) - add a review (
/reviews/add) - show only "my" reviews (
/reviews/mine)
- all reviews (
- to add styles, place a css file in
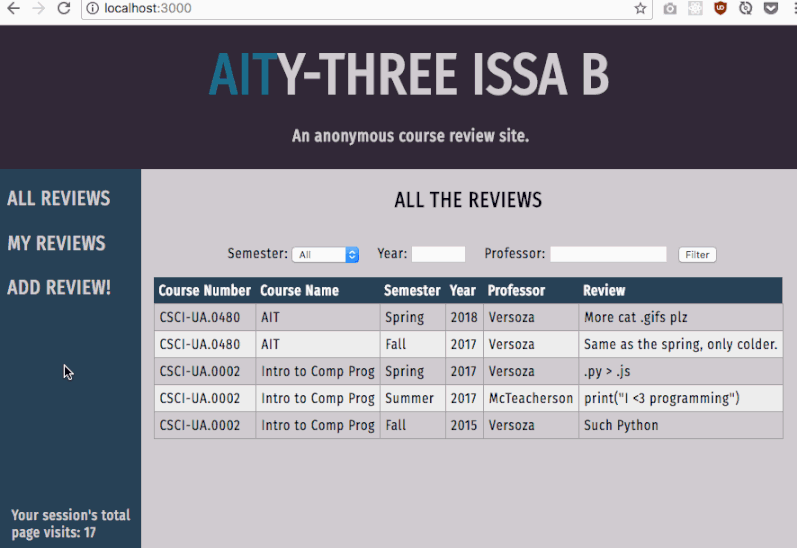
- once you've completed all of the steps above, you should have a page that looks like the image under the Example heading below
- again, your sites styling, and even copy (that is the text content) does not have to match exactly; it's your decision how to style and what to name your site
- the following elements are shown in the image below, but do not have to be implemented yet
- the filter form will be added in the section
- the number of session visits will be added later in the instructions
Example - All Reviews
Part 3 - Filtering
Overview
In this part of the assignment, you'll add a form to your page that allows you to filter the table by semester, year, and professor's name via GET and query string parameters.
Details
You already know how to do most of this, but here's a rough sketch of some of the relevant tasks:
- in the same page as your table of reviews, create a form that uses GET
- it should go to '/' when submitted
- note that we don't need
req.bodyfor this since the request should be a GET - also… why are we using GET instead of POST? because we're merely reading data… (pretty common convention for search / filter)
- modify your request handler to try to get the value of query string parameters (
req.query.nameOfFormElement)- for example, submitting your form may result in adding a ?foo=bar to the url
- to access that name/value pair in the query string on the server side,
req.query.foo
- use the value passed in from the form (via GET and the query string) to filter the reviews by director name
- however, instead of passing in an empty query object,
{}, to find, pass in an object with the appropriate keys and values based on form input- the keys should match the property names defined in your schema
- multiple key / value pairs within the query object behave as if they were combined with
and… {foo: 'bar', baz: 'qux'}would match all documents that havefoo == 'bar' AND baz == 'qux'- see the mongoose docs and mongodb docs for more info on
find
- see the example below for a filter form in action!
Example - Filtering Reviews

Part 4 - Adding a Review
Overview
In this part of the assignment, you'll create another page that contains a form to add new reviews. The form will POST data… and then redirect back to /.
Details
Again, you've already done something similar in a previous assignment (using an in-memory store), but here's a rough sketch of some of the relevant tasks:
- make sure that the following steps from earlier in the instructions have been completed:
- check that a link to
/reviews/addhas been created in all of your pages - …and that you are able to parse http POST request bodies so that
req.bodyis available
- check that a link to
- create the appropriate route handlers that accepts requests for
/reviews/add - you'll two route handlers for
/reviews/add: one for showing the form and one form processing the form- GET will handle showing the form
- create another template file
- add a form to your template
- POST will handle the form submission
- your request handler that deals with POSTs will create a new review in the database… check out the slides
- when it's done, it should redirect back to the page that shows all of the reviews
- GET will handle showing the form
Example - Adding a Review

Part 5 - Pages Visited (by session)
Now that we have basic adding and filtering done, it's time to add some session based features. Check out the the slides on express-session middleware before starting (they're near the end of the slides).
Once your familiar with express-session, find a way to keep a count of the total number of pages that a user has seen. We can identify users by their session (which express-session will generate for us). Consequently, different sessions (for example, visiting the site on two different browsers) will increment different, independent, count totals.
- keep track of the number of times a user has visited any page on the site
- on all pages, display the number of pages a user has visited
Your session's total page visits: [some number]- again, this should be shown on all pages
- one way to do this is to use
res.locals(see the express documentation on res.locals)- adding a property to
res.localsmakes that value available to all templates (with the property name as the variable name) - in the example code in the documentation, middleware is used to create a property on res.locals for every request
app.use(function(req, res, next){ res.locals.user = req.user; res.locals.authenticated = ! req.user.anonymous; next(); }); - this property will be available in every template rendered (including
layout.hbs) - using the example above, regardless of what template you're in (again, including
layout.hbs), you can useuserandauthenticatedas template variables! 👍
- adding a property to
- you'll have to find some way of incrementing a counter variable that's session dependent (that is, different client sessions will have different visit counts) for every page visited, regardless of page / path
- once you've implemented this, try refreshing the page or flipping back-and-forth between viewing all reviews and adding a review
- you should see the counter increment similar to the animation shown in the example section below
Example - Keeping Track of Number of Pages Visited During Session
Part 6 - Movies Added (by session)
Finally, create one last page (which makes 3 total), /reviews/mine, showing all of the reviews that have been added by the user during their session.
- you must use the
express-sessionmiddleware to do this (see the relevant slides) - there are a few ways to implement this:
- storing review objects directly in the session (as well as in the database)
- or (more complicated) modify your schema / model so that you can store the session id of the session that created a review
req.session.idwill contain the id for that particular session
- make sure you link to
/reviews/minefrom both of the existing pages so that the graders can see that you've implemented this feature - the example below assumes that the last class was entered during the user's session… so it shows up under the 'My Reviews' page
Example - Show The Movies Added for the Session
